Navigation: Installation > Migrating Access Data >
Copy Source Files


|
Navigation: Installation > Migrating Access Data > Copy Source Files |
|
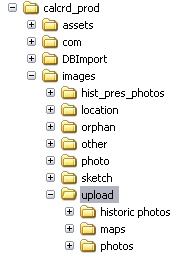
Copy all your files into the directory specified as the "tmpImages" directory in the ini file (see Config.ini File Settings). The default is the <siteroot>/images/upload. Copy all your docs, maps, sketch maps, location maps and photos into this directory.
 In the Access Version of CHRID these images could be stored in any location - your local hard disk, a network drive, your "home" directory etc. In the new application all the image files are stored in a very specific location specified by the INI file. Part of what you will need to do is "gather up" all the image files and pool them together in a single directory.
Handling Duplicates - In the old system you could have 2 files named the same as long as they were in different locations. The new system uses more specific storage locations and therefore must have unique file names. Not to worry, the system creates unique file names for you when you upload a file. When migrating however, you may end up with duplicates that you are trying to "pool" together into the tmpImages folder. In this case you have 2 choices.
1. Alter the access DB - Change the name of the image and change the value stored in the access DB to insure that it is unique.
2. Edit After the Fact - After the import you can go through the data and update each item with the "correct" image. Basically you are "skipping" the image import for that form and "manually" entering the image after the migration is complete.